(ขอเกริ่นอาการของผมก่อนคับ ล่าสุดผมเกิดอาการสลับภาษาแล้วค้างใน version 38-39 เนื่องจากการปรับรุ่นให้เองของโปรแกรม จึงถอดออกแล้วลง version ที่ใช้ได้ที่ไม่เกิดอาการค้าง คือ version 35 ส่วนวิธีทำด้านล่างคับ คือก่อนรื้นถอนผมได้ลอง
1.สแกนตามวิธีด้านบนแต่ก็ไม่หาย
2.และอีกกรณีที่ ให้เปลี่ยน region เป็น english แต่ถ้าทำจะมีผลกับตัวโปรแกรมไทย ที่ coding ขึ้นมา ด้วย non-unicode ทำให้ ภาษาไทยอ่านไม่ออก รวมถึงรุปแบบของวันเวลา ผมจึงทำการถอนและลง chrome version ตัวที่ทำงานได้และไม่เก่าเกินไป เพราะผมก็ต้องเขียน javascript และลองโค็ด javascipt css3 html5 ใหม่ๆด้วย
3.movie toolbar ในระบบผมก็ไม่มีติดตั้ง ดูใน add-remove program ไม่มี และใน log scan ไม่เจอ)
กรณี #chrome browser ตัวที่อัพเดทล่าสุดไปแล้ว เช่นอัพเดทเป็นเวอร์ชั่น 38 หรือ 39 ทำให้เกิดอาการค้าง เมื่อ ทำการเปลี่ยนหรือสลับภาษา
วิธีแก้ #สลับภาษาแล้วค้าง
1.ถ้าไม่ใช่เกิดจาก พวก malware หรือ adware และเป็นเฉพาะ chrome ตัวเดียว browser ตัวอื่นๆ ไม่เป็น ก็ให้ทำการแก้โดย ถอนโปรแกรมออกแล้วลง chrome เวอร์ชั่นก่อนหน้าที่ ที่ยังทำงานสลับภาษาได้อยู่ไม่ค้าง หรือให้ลง เวอร์ชั่นก่อนหน้านี้ เช่น เวอร์ชั่น 35 (ลิงค์โหลดให้เลือกด้านล่างมีหลายเวอร์ชั่น #google chrome old version)
2.เมื่อลงติดตั้งเสร้จเรียบร้อยให้ ปิด google update ไม่ให้ตัว chrome ทำการอัพเดทอัตโนมัติ โดยพิมพ์ chrome://plugins แล้วทำการ disable มัน
3.บางครั้งการสั่ง disable google update ในข้อสอง ไม่สามารถปิดการ disable google update ไม่อย่างแท้จริง เนื่องจาก ยังมีการทำงาน แบบ silent update เมื่อถึงคาบหรือรอบการอัพเดท มันอัพเดทให้เราเอง โดยที่เราไม่รู้หรือไม่มีการแจ้ง prompt ก่อนให้เราอนุญาติ ดังนั้น เพื่อให้ google ปิดอัพเดทจริง ต้องเข้าไปแก้รีจีสเตอร์ และหรือสั่ง ที่ gpedit วิธีตามลิงค์นี้คับ http://joegtec.blogspot.com/2014/12/disable-chrome-silent-updates.html (ลิงค์ไฟล์สำหรับใช้เพื่อ disable google update ผมรวมไว้ให้ ควรอ่านวิธีใช้ตามลิงค์บนที่ให้ก่อนนะคับ-->https://drive.google.com/folderview?id=0BzjoxIwEMrM-SC1qQ09iODBRalk&usp=sharing หลังจากอ่านวิธีแล้ว สำหรับผมเลือก วิธีแบบ manual update (วิธีนี้ จะอัพเดทก็ต่อเมื่อ เราเข้าไปทำการอัพเดทเอง ที่ about google chrome ) อาการที่กูเกิลแอบอัพเดทแบบเงียบๆหายไปอย่างแน่นอน เพราะทุกครั้งที่ผมทำ ข้อ2 ไปแล้ว อีกวันเปิดเครื่องมา มันอัพเดทเรียบร้อยเป็นเวอร์ชั่นล่าสุด(วิธีดูเวอร์ชั่น chrome พิมพ์ chrome://version/ ในช่อง address) แต่ผมทำวิธีนี้ไม่อัพเดทเลย รับรองทำแล้ว google ไม่อัพเดทแน่นอน หรือ ท่านจะเลือกอีกออฟชั่นคือ แบบ disable update ไปเลยก้ได้นะครับมันมีให้เลือก
4.ทดสอบการสลับภาษา อาการค้างควรหายไป + และ pluging ของ กล้อง cctv webcomponent.exe ใช้งานได้ หลังจากนั้นก็รอ เวอร์ชั่นปรับปรุงที่ไม่มีปัญหา ค่อยอัพเดทใหม่ด้วยตนเองอีกครั้ง
https://plus.google.com/112496984277605158285/posts/ViAzGBVvdsY <--link ดาวน์โหลด #google chrome old version ผมรวมไว้ให้แล้วเลือกเอานะครับ
วันเสาร์ที่ 13 ธันวาคม พ.ศ. 2557

JoeGTEC's path: Disable Chrome Silent Updates
JoeGTEC's path: Disable Chrome Silent Updates: http://www.bleepingcomputer.com/tutorials/disable-chrome-automatic-updates/ ดาวน์โหลด ไฟล์ที่ใช้ disable chrome update When you instal...
วันศุกร์ที่ 12 ธันวาคม พ.ศ. 2557
Disable Chrome Silent Updates
http://www.bleepingcomputer.com/tutorials/disable-chrome-automatic-updates/
ดาวน์โหลด ไฟล์ที่ใช้ disable chrome update
When you install a program on to your computer it is important that the owner has full control over what actions are performed by this program. Whether that be because the machine is in an enterprise setting and you need to have perform patch testing or because your a consumer who wants to be notified and give consent when a program is being updated. Regardless of your reasons, it is every users right to know what program is running, when it is running, and why it is running. With this in mind, this tutorial will provide instructions on how to turn off the silent and automatic updates in Google Chrome. In fact, some of the steps described here will work for almost all Google applications available, but for this guide we will focus entirely on Google Chrome.
There are two methods to control how updating occurs in Windows Google applications. The first is through a Group Policy Editor administrative template that is provided by Google. The second method is to manually modify Windows Registry keys that control the behavior of Google applications in regards to how they update. This guide will provide instructions on using both methods as not every version of Windows has access to the Group Policy Editor. For those who do not feel comfortable with the Windows Registry Editor, I have also created a Registry file that enables manual updates for Google Chrome and another one that enables Chrome's default update policy of using silent updates.
It is strongly advised that you continue to update Chrome, and any other application for that matter, when new updates become available regardless of how these updates are found. Outdated programs are a prime vector for malware infections and computer data theft and by not updating your programs you put yourself, your data, and your computer at risk. So even if you set Chrome to use manual updates, please routinely check for updates in order keep Chrome secure.
Is is also important to note that Google Chrome includes Adobe Flash as an integrated plugin. That means that if there a security vulnerability in Flash, which is a common vector for malware infections, you will need to update Chrome in order to receive the latest version of Flash. Therefore, only disable automatic updates if you are in a controlled environment or routinely check for new versions.
Disable Chrome Silent Updates via the Windows Registry
One method to disable silent updates in Chrome is to manually add the policies to the Windows Registry. If you do not care about the specifics of the Windows Registry configurations, you can skip to the Registry files below that can disable and enable silent updates in Chrome. The Windows Registry key responsible for determining how Google Update updates Chrome can be found in the following Registry key and value:
HKEY_LOCAL_MACHINE\SOFTWARE\Policies\Google\Update "Update{8A69D345-D564-463C-AFF1-A69D9E530F96}"This value can have 4 different DWORD settings assigned to it that describe how Chrome will be updated. These different DWORD values are:
0 - This setting corresponds to the Updates disabled policy setting. This means updates are completely disabled for Chrome.To change the Google Update setting for Chrome simply create the above key and value and assign one of the above value.
1 - This setting corresponds to the Always allow updates policy setting. This means that updates are always installed regardless of whether they were found via periodic silent updates or a manual update check.
2 - This setting corresponds to the Manual updates only policy setting. This means updates are only applied when a user performs a manual check.
3 - This setting corresponds to the Automatic silent updates only policy setting. This means updates are only installed when they are found via the periodic silent update check.
For those who do not want to mess with the Windows Registry and just want to enable manual updates, I have created two Windows Registry files. The first one will enable Manual updates and the second one will restore Chrome back to its normal defaults of updates being installed via silent updates or manual updates.
Registry file to set Chrome to Manual Updates onlySimply download one of the above Registry files and save them to your desktop. Then double-click on the registry file and allow the changes to be merged into the Registry. The changes to Google Update for Chrome will now be set.
Registry file to reset Chrome back to its default update policy (Manual+Silent Updates)
Manage Chrome Updates via the Group Policy Editor
For those who want more control over how Google Update updates various Google applications, you can download a Group Policy Editor Administrative template. This template will allow you to manage how Google Update handles updates for all of the Google applications from within the Group Policy Editor.
Before you begin, you need to first download the Google Update Administrative Template from the following location:
http://dl.google.com/update2/enterprise/GoogleUpdate.admOnce the file is downloaded start the Group Policy Editor. This can be done via the Windows control panel or by typing gpedit.msc in the Run or search fields of the Start Menu. Once the Group Policy Editor is open you should expand the Computer Configuration leaf node. Then right-click on the Administrative Templates node and select Add/Remove Templates... as shown in the image below.

Adding a template to the Group Policy Editor
The Add/Remove Templates dialog screen will open and you will see a list of installed templates. Do not be concerned if this list is blank as that is perfectly normal. Now click on the Add button and browse to the location where you download the Google Administrative Template. When you find it, double-click on it, and you should now be brought back to the Add/Remove Templates screen, but should now see the GoogleUpdate Template listed. This can be seen in the image below.

GoogleUpdate template has been added
Now press the Close button and you should be back at the main screen of the Group Policy Editor. Now we need to navigate to the Chrome group policy. This can be found at the following locations depending on your version of Windows.
For Windows XP, Windows 2000, Windows Server 2003:
Local Computer Policy -> Computer Configuration -> Administrative Templates -> Google -> Google Update -> Applications -> Google ChromeFor Windows Vista, Windows Server 2008, Windows 7, Windows 2008 R2, and Windows 8:
Local Computer Policy -> Computer Configuration -> Administrative Templates -> Classic Administrator Templates -> Google-> Google Update-> Applications -> Google ChromeWhen you select the Google Chrome node, you will see two settings in the right-hand pane. Please double-click on the Update policy override setting. When the setting's dialog box opens, select the Enabled option and you will see a screen similar to the one below.

Google Update policy for Chrome
At the above screen you can now change this setting to one of the following policies:
Always allow updates: This setting means that updates are always installed when they are found via manual checks or silent update checks.You should now select the policy you wish to use. For the purpose of this tutorial, you should select Manual updates only and then press the Apply button and then the OK button. The policy will now have been set in the Windows Registry and you can now close the Group Policy Editor.
Manual updates only: This setting means that updates are only installed when found during a manual check.
Automatic silent updates only: This setting means that updates are only installed when found via periodic silent update checks.
Updates disabled: This setting will disable all updates for Google Chrome.
For more information about Google's Administrative Template for Google Update, you can visit this page.
How to manually check for updates in Google Chrome
If you decide to disable silent updates, then it is becomes important to know how to update Chrome manually. To update Chrome, simply start the program and click on the wrench icon (
 ) in the upper right-hand corner. When the menu appears, click on the About Google Chrome
menu item. If there is a new update available, Chrome will alert you in
the About Chrome screen and provide instructions on how to apply that
update.
) in the upper right-hand corner. When the menu appears, click on the About Google Chrome
menu item. If there is a new update available, Chrome will alert you in
the About Chrome screen and provide instructions on how to apply that
update.วันอังคารที่ 2 ธันวาคม พ.ศ. 2557
เปิดวิธีเด็ดๆ ไล่จับคนร้ายโกงเงินซื้อของทางอินเทอร์เน็ต
เปิดวิธีเด็ดๆ ไล่จับคนร้ายโกงเงินซื้อของทางอินเทอร์เน็ต
โพสต์เมื่อ : 1 ธันวาคม 2557 เวลา 23:21:41

เรียบเรียงข้อมูลโดยกระปุกดอทคอม
ขอขอบคุณข้อมูลและภาพประกอบจาก คุณ ZeedTaza สมาชิกเว็บไซต์พันทิปดอทคอม
เปิดวิธีไล่จับคนร้ายโกงเงินซื้อของทางอินเทอร์เน็ตเด็ด ๆ ซึ่งไม่ใช่เรื่องยากหรือเรื่องง่ายจนเกินไป โดยทาง คุณ ZeedTaza สมาชิกเว็บไซต์พันทิปดอทคอม เป็นผู้นำเสนอวิธีเอาไว้ได้อย่างน่าสนใจ
เมื่อวันที่ 1 ธันวาคม 2557 ในโลกอินเทอร์เน็ตกำลังแชร์กระทู้ในเว็บไซต์พันทิป ของคุณ ZeedTaza ซึ่งเป็นการนำเสนอวิธีจับคนร้ายที่โกงการซื้อสินค้าผ่านทางอินเทอร์เน็ต โดยวิธีที่ไม่ยากไม่ง่าย ทางเจ้าของกระทู้ได้นำเสนออยู่ 2 วิธีด้วยกัน หลังจากถูกโกงเงินซื้อสินค้า นั่นคือ ตามตัวเอง หรือไม่ก็ส่งเรื่องให้กองปราบปรามการกระทำผิดเกี่ยวกับอาชญากรรมทางเทคโนโลยี เป็นผู้จัดการ ส่วนรายละเอียดจะเป็นอย่างไรบ้าง ตามข้อมูลด้านล่างเลยจ้า
มาระบายประสบการณ์กันค่ะ ซื้อของทางไหน โดนใครโกงไปบ้าง....
ช่วงนี้หลายคน ๆ ซื้อของทางเนตแล้วโดนโกงเพิ่มขึ้นเยอะมากกกกกก คิดว่าคงทำกันเป็นแก็งค์ เป็นล่ำ เป็นสันเลยมั้งค่ะปีนี้ เฮ้ออ
จขกท. เป็นอีกคนที่พึ่งโดนโกงครั้งแรกค่ะ หลังจากที่ซื้อของงออนไลน์มา 4-5 ปีประจำ เนื่องจากมันถูกกก !! + เบื่อฝ่ารถติดออกจากบ้าน
ขอเล่าประสบการณ์ของตัวเองก่อนนะคะ เราอยากได้มือถือสำรอง เลยสั่งซื้อมือสอง จากเว็บชื่อดัง โอ้ แอ๋ว แอ๊บ 555+ เสร็จแล้ว เลยคุยตกลงซื้อขายกับผู้ขายทางไลน์ (คนขายชื่อนายอภิชัย ปxxx) จะได้มีหลักฐานเก็บไว้ ก่อนโอนได้ขอชื่อ นามสกุล บัตรประชาชน (มันให้ใบขับขี่มาแทน) เบอร์ติดต่อ bookbank+ภาพถ่าย เอาไว้
พอเราเช็คว่าชื่อบัญชีที่โอนกับชื่อบัตรตรงกัน พอเช็คประวัติจาก google และทางเว็บว่าไม่มีประวัติเสียอะไร ก็โอนเงินไปค่ะ พอโอนเสร็จปุ๊ป ก็ตามนี้ค่ะ บอกว่าส่ง ems ให้แล้ว และ หายแวปปปปป ออกจากไลน์ไป เร็วยิ่งกว่านรกนะ

โทรศัพท์ก็ปิดหนีไปตามระเบียบ ประกาศก็ลบไแล้วจ้า (ข้อผิดพลาดของเราจุดแรกนะคะ ใจร้อนเกินไป ในกรณีนี้ควรให้ส่งแบบ พกง. แม้มันจะปฎิเสธว่าส่งไม่เป็นค่ะ, ของเรานัดรับไม่ได้เพราะอยู่ ตจว.อะจ้ะ)
เสร็จแล้ว เราก็รอ 2 วัน เฟิมว่าโดนโกงแน่แล้ว เราก็รวบรวมหลักฐานที่เก็บมา + หาข้อมูลมันจาก google หาให้ได้มากที่สุดนะค่ะ
- และนี่เป็นหลักฐานอื่น ๆ ที่เราพอหาได้ เมื่อค้นข้อมูลจากพี่กู๋นะค่ะ เจอรูปถ่าย 2 ใบ แต่งงานแล้ว อายุ 31 ปี บ้านเกิดอยู่ที่อ่างทอง ลงประกาศจากลพบุรี และบัญชีปลายทางทั้ง 2 บัญชีของมันเกิดที่ กทม. ค่ะ และบุคคลที่ใช้ชื่อนี้ยังไม่มีประวัติการโกงบนเว็บ และประวัติการโกงทางคดีอื่น ๆ (อันหลังนี่เราให้พี่เราช่วยเช็ก) เด๋วเราจะมาบอกวิธีเช็กข้อมูลด้านล่างนะค่ะ
รูปถ่ายของนายอภิชัย ปxxx ค่ะ ขออนุญาตเอาออกไปนะค่ะ อีกรูปขอไม่แฉนะค่ะ มันถ่ายกับเมียหรือกิ๊กมันค่ะ
และต่อไปนี้.... เป็นขั้นตอนการจับคนร้ายที่เราพอรวมๆมาได้ ผิดพลาดตรงไหนไปขออภัยค่ะ ช่วย ๆ กันเสริมจะได้มีประโยชน์กับผู้อื่นกันค่ะ (หลาย ๆ คนพอรู้ว่าโดนโกง คิดว่าไงก็ตามคืนไม่ได้แน่ ๆ คิดใหม่นะคะ เพื่อน จขกท. ทำตามนี้ได้คืนมาเยอะค่ะ)
1. ตามสืบเอง หรือ
2. รวบรวมข้อมูลส่งให้ กองปราบปรามการกระทำผิดเกี่ยวกับอาชญากรรมทางเทคโนโลยี กทม.
มาเริ่มที่ข้อแรกค่ะ ตามสืบเอง ฉบับรวบรัด (ขอบคุณข้อมูลจาก pantip วิธีพี่ช่วยได้มาก ๆ เลย)
1. เริ่มสงสัยติดต่อไม่ได้ ให้สงสัยไว้ก่อนเลยว่า ผ่านไป 1-2 วันยังติดต่อไม่ได้ งานเข้าแน่ ๆ
2. พอแน่ใจแล้วว่างานเข้า รีบไปแจ้งความแล้วส่งใบแจ้งความ แนบกับกระทู้ที่โดนโกงส่งให้ Admin ขอเลข IP ก่อนเลยนะคะ ขั้นตอนนี้ต้องทำก่อนเลย
3.นำเลข Ip ตรวจสอบว่าเป็นผู้ให้บริการ ที่ไหน เช่น TOT TT&T เป็นต้น เช็กได้จาก เน็ตเลยค่ะ ไม่ยาก ๆ
4.ทราบแล้วว่าเป็นโทรศัพท์เป็นของใคร TOT/TT&T ให้ไปแจ้งขอเบอร์บ้านด่วน โดยนำใบแจ้งความเบิกทางให้เราทั้งหมด
5.ได้เบอร์บ้านมา และที่อยู่มันก็ไม่ยากแล้วค่ะ แค่นี้ก็น่าจะเห็นแวว คนร้ายแล้ว (ตรงนี้อาจจะขอให้ตำรวจช่วยค้นที่อยู่ หรือ ลองเสริจที่อยู่จาก google จากเบอร์โทรศัพท์ หรือจาก yellow page ก็ได้ค่ะ) (พอได้ที่อยู่มาแล้ว ก็ลากเพื่อนไปรุมกระทืบเลยค่ะ!!)
อีกนิด
- เราสามารถสืบจากเลขที่บัญชีว่าเป็นของใคร โดยโทรไปที่ call center ธนาคาร แจ้งเลขที่บัญชี ก็รู้สาขาที่เปิดบัญชี ได้แล้วค่ะ
- ถ้าเรามีเลขบัตรประชาชน ให้ไปเวปนี้ค่ะ เราจะรู้ว่ามันเป็นคนจังหวัดอะไรhttp://www.tentdd.com/ml-idcard-check.html
- http://people.yellowpages.co.th ใช้ค้นหาชื่อ หาญาติ หาเบอร์ ได้หมดค่ะ
- ในระหว่างรอ อาจจะโทรไปหาญาติเค้าที่เราได้เบอร์มา ถามว่ารู้จักคนชื่อนี้ ๆๆ มั้ย แล้วเล่าเหตุการณ์ไปคุยกับเค้าดี ๆ เผื่อเค้าจะพอรู้จักบ้างค่ะ
วิธีที่ 2 รวบรวมข้อมูลส่งให้ กองปราบปรามการกระทำผิดเกี่ยวกับอาชญากรรมทางเทคโนโลยี กทม.จัดการ

1. พิมพ์ข้อมูลเกี่ยวกับรายละเอียดที่โดนโกง ตามนี้เพื่อไปยื่นกับ สน.ท้องที่ (ไม่งั้นคุณจะใช้เวลานานมากค่ะ ถ้าไปปากเปล่า)
2. เตรียมหลักฐานการโอนเงิน , เลขบัญชีที่ท่านโอนเงินไป , หลักฐานการติดต่อระหว่างคุณกับมิจฉาชีพ เช่น e-mail, เบอร์โทรศัพท์ หรือหมายเลขพัสดุ
3. แจ้งความกับเจ้าหน้าที่ตำรวจที่ สน.ท้องที่ที่คุณไปโอนเงิน ว่า "ถูกฉ้อโกง" เพื่อลงบันทึกประจำวัน และออกใบแจ้งความเพื่อดำเนินคดี
4. นำใบแจ้งความ, หลักฐานการโอนเงิน และ สำเนาบัตรประชาชนของผู้เสียหาย ข้อมูลผู้ขาย ส่งทาง admin เวปเพื่อขอ ip address
5. กรอกแบบฟอร์มดำเนินดีของกองปราบ ตามนี้ (save และเอาไปปริ้นเองนะค่ะ)
6. นำเอกสารข้อ 2-5 ส่งให้กองบังคับการปราบปรามการกระทำความผิดเกี่ยวกับอาชญากรรมทางเทคโนโลยี (http://www.tcsd.in.th)
ที่อยู่ กองบังคับการปราบปรามการกระทำความผิดเกี่ยวกับอาชญากรรมทางเทคโนโลยี
ศูนย์ราชการเฉลิมพระเกียรติ 80 พรรษา อาคาร B ชั้น 4 ถ.แจ้งวัฒนะ เขตหลักสี่ กทม. 10210
คำแนะนำ : ต้องแจ้งกับเจ้าหน้าที่ว่า "ขอให้เจ้าหน้าที่ดำเนินคดีจน กว่าคดีจะถึงที่สุด" ส่งเป็นแบบตอบรับนะค่ะ จะได้รู้ว่าถึงแล้ว ซัก 2-3 วันโทรเข้าไปเฟิมกับเจ้าหน้าที่ถึงเคสที่เราส่งไปอีกทีค่ะ
อย่างที่หลายคนพูด เรื่องเหมือนจะง่ายแต่ไม่ง่าย แต่มีเพื่อน จขกท. ทำตามขั้นตอนนี้แล้วได้คืนก็มีค่ะ ไม่ใช่ไม่มีเลย เราเลยพอเอาแนวทางมาแบ่งปันบ้าง
ตอนนี้ จขกท.ได้ที่อยู่มาแล้ว กำลังส่งให้คุณตำรวจดำเนินการต่อไป ซึ่งในเคสนี้ เป็นไปได้ว่า นายอภิชัย ปxxx อาจเป็นแค่หน้าม้า เป็นแก็ง หรือป็นคนร้าย แต่ก็มีความผิดค่ะ เพราะชื่อบัญชีกับชื่อในบัตรประชาชนที่เราโอนไปเป็นคนเดียวกัน เมื่อเราสาวตัวถึงนายอภิชัย ปxxx ได้ อาจพบเบาะแสในการตามตัวต่อไป ดีกว่าไม่ทำอะไรเลย
ท่านไหนที่โดนโกงแล้วจับคนร้ายได้แล้วบ้างค่ะ อยากให้เอาข้อมูลมาช่วย ๆ กันแชร์เผื่อเพื่อนๆคนอื่นที่กำลังเจอปัญหานี้เหมือน ๆ กันค่ะ
ปล.หวังว่ากระทู้นี้จะเป็นประโยชน์กับทุกคนนะค่ะ จขกท.ไม่ได้เก่งอะไร พอเล่นอินเทอร์เน็ตเป็นบ้าง ก็พอหาข้อมูลรวม ๆ บ้างไปตามประสา ข้อมูลบางส่วนรวบรวมที่หาได้จาก pantip และที่อื่น ๆ มานะคะ ขอขอบคุณผู้ที่แนะแนวทางให้ก่อนหน้า มีประโยชน์จริง ๆ ค่ะ มีตรงไหนผิดไปก็ขออภัยค่ะ
http://hilight.kapook.com/view/112223
ขออนุญาตแทกห้องแป้งนะค่ะ เข้าไปอ่านบ่อยเผื่อมีประโยชน์จ้า
ปล. ถ้า tag ผิดห้องไปบ้าง ต้องขออภัยนะคะ
-----------------------------------------
Update... 1 ธ.ค. 57
ไม่คิดว่าหลังจากพิมพ์ออกไปไม่นานจะมีคนเข้ามาอ่านและแชร์เยอะขนาดนี้ แหะ แหะ.... มาเห็นอีกที เฟสแม่ จขกท. ก็มีอะ....อร้ายยยยย ขอบคุณทุก ๆ คนที่เข้ามาอ่านกระทู้นี้นะคะ และขอให้หลายคนที่กำลังประสบปัญหานี้อยู่ตามจับคนร้ายให้ได้ค่ะ
เมื่อสักครู่ มีคนหลังไมค์มาเยอะเลยค่ะ ว่าโดนนายอภิชัย ปxx หลอกมาเหมือนกัน
บางรายก็บอกว่าเป็นนายอภิชัยตัวจริงให้เราลบทู้ออก แปลกนะค่ะมีนายอภิชัย ปxxx ทักมาหลาย account เลย...คนเราไม่น่าจะกลายร่างได้เร็วขนาดนั้นนะคะ เอาไงดีค่ะ นักสืบ pantip ช่วยหน่อย....
ปีนี้หลายคนคงโดนกันเยอะจริง ๆ จำได้ว่าตอน จขกท. นั่งแจ้งความอยู่ ยังมีน้อง ๆ เด็ก ๆ หลายคนรอคิวแจ้งความอยู่ด้านหลัง ร้องไห้บ้างก็มี
กระทู้นี้อาจช่วยได้บ้าง ไม่ได้บ้างอย่างไร แต่เราคิดว่าอย่างน้อยก็พอเป็นแนวทางในการสืบนะค่ะ แต่ที่ดีที่สุดคือการป้องกันหรือแก้ที่ต้นเหตุค่ะ
ตอนแรก จขกท. จะเอารูปคนขายมาใส่เพิ่ม หลังจากที่ตอนแรกลบหน้าออกไป คิดว่า ลงแล้วคงต้องลงให้ถึงที่สุด เนอะ ไง รอก่อนแล้วกัน'
ทั้งหมดนี้ก็คือวิธีเบื้องต้นที่ทางเจ้าของกระทู้ได้นำเสนอมา ซึ่งน่าจะเป็นประโยชน์ไม่น้อยสำหรับคนที่ชอบซื้อของผ่านอินเทอร์เน็ต
ปล. ถ้า tag ผิดห้องไปบ้าง ต้องขออภัยนะคะ
-----------------------------------------
Update... 1 ธ.ค. 57
ไม่คิดว่าหลังจากพิมพ์ออกไปไม่นานจะมีคนเข้ามาอ่านและแชร์เยอะขนาดนี้ แหะ แหะ.... มาเห็นอีกที เฟสแม่ จขกท. ก็มีอะ....อร้ายยยยย ขอบคุณทุก ๆ คนที่เข้ามาอ่านกระทู้นี้นะคะ และขอให้หลายคนที่กำลังประสบปัญหานี้อยู่ตามจับคนร้ายให้ได้ค่ะ
เมื่อสักครู่ มีคนหลังไมค์มาเยอะเลยค่ะ ว่าโดนนายอภิชัย ปxx หลอกมาเหมือนกัน
บางรายก็บอกว่าเป็นนายอภิชัยตัวจริงให้เราลบทู้ออก แปลกนะค่ะมีนายอภิชัย ปxxx ทักมาหลาย account เลย...คนเราไม่น่าจะกลายร่างได้เร็วขนาดนั้นนะคะ เอาไงดีค่ะ นักสืบ pantip ช่วยหน่อย....
ปีนี้หลายคนคงโดนกันเยอะจริง ๆ จำได้ว่าตอน จขกท. นั่งแจ้งความอยู่ ยังมีน้อง ๆ เด็ก ๆ หลายคนรอคิวแจ้งความอยู่ด้านหลัง ร้องไห้บ้างก็มี
กระทู้นี้อาจช่วยได้บ้าง ไม่ได้บ้างอย่างไร แต่เราคิดว่าอย่างน้อยก็พอเป็นแนวทางในการสืบนะค่ะ แต่ที่ดีที่สุดคือการป้องกันหรือแก้ที่ต้นเหตุค่ะ
ตอนแรก จขกท. จะเอารูปคนขายมาใส่เพิ่ม หลังจากที่ตอนแรกลบหน้าออกไป คิดว่า ลงแล้วคงต้องลงให้ถึงที่สุด เนอะ ไง รอก่อนแล้วกัน'
ทั้งหมดนี้ก็คือวิธีเบื้องต้นที่ทางเจ้าของกระทู้ได้นำเสนอมา ซึ่งน่าจะเป็นประโยชน์ไม่น้อยสำหรับคนที่ชอบซื้อของผ่านอินเทอร์เน็ต
วันจันทร์ที่ 24 พฤศจิกายน พ.ศ. 2557
fax attachment on fax console on xp
http://www.slipstick.com/outlook/using-windows-xp-fax/
 Figure 1
 Figure 2
Once again we have Russ Valentine, Outlook MVP and cardiologist, who dwells in the Land of Fax every day, to thank for working through the oddities of a new fax program.
Windows XP Fax is the latest iteration of Windows 2000 Fax and its predecessor, NT Personal Fax (a popular technical preview that never saw the light of day but is still in use today by those who can find it). I took this new fax program out for a spin to see what’s new. As usual, there’s both good news and bad news to report. Microsoft both giveth and it taketh away. I’m here to show you what’s better, what’s not, and how to make the most out of using this new fax service with Outlook.

Setup and Configuration
You can only install Windows XP Fax by using the Add/Remove Windows Component utility in Control Panel. That gives you the chance first to make sure your fax modem is installed and configured correctly and thereby avoid many of the ‘misses’ that occurred with Windows 2000 Fax installation. All you need to do to install Windows XP Fax is point the installation routine to the source for your XP installation files.
The Fax Configuration Wizard will start the first time you access any of the fax functions from the Start menu. Here you can set up your basic fax functions. Configuration of XP Fax is much simpler and more intuitive than it was in Windows 2000. For example, you can enable fax reception in this wizard rather than following the nearly undiscoverable path that was necessary in Windows 2000. Installing the fax service creates a fax printer automatically and in its properties you can configure the rest of your faxing options, such as how you’d like the Fax Monitor to behave. Many users have complained that the Fax Monitor fails to appear in the system tray to allow quick access to the fax service, but its absence is all part of Windows XP’s clean-up of the desktop. The Fax Monitor will only appear in the system tray when a transmission or reception is in progress. If you have manual reception enabled, the Fax Monitor will pop up automatically to allow you to answer an incoming fax call.
For users who upgrade from Windows 9x and are using Microsoft Fax, Windows XP Fax replaces Microsoft Fax. An upgrade saves device configuration, providing that you have only one device before the upgrade and one device after the upgrade. Upgrading also saves sender information and cover pages. You can access existing Microsoft Fax archives using the Microsoft Exchange client you used before the upgrade, but you cannot import archived faxes using the Windows XP Fax Console. Following upgrade, when you open an archived fax from your mail application it opens in TIFF format with Image Preview, the Windows XP image viewer.
For users upgrading from Windows 2000 who are using the Windows 2000 Fax Service, Windows XP Fax replaces it. Upgrading saves both device configuration and sender information. Cover pages are available after upgrading. Windows 2000 Fax archives can be imported into the Windows XP Fax Console (File | Import).
Usage
As in Windows 2000 Fax, the Send Fax Wizard is XP Fax’s native sending utility. You invoke it when you select the "Send a Fax”‘ program from the Start menu. It can only send a fax on a Cover Page. It advises you that if you want to send a document instead, you should use the Print to Fax routine from the document’s application. Neither of these faxing options uses Outlook for sending the fax. In XP Fax the Fax Console is now the hub for faxing operations. Here you can manage incoming, outgoing and archived faxes. You can make or revise all your configuration settings in this one place rather than having to make them in several locations as you did in Windows 2000.
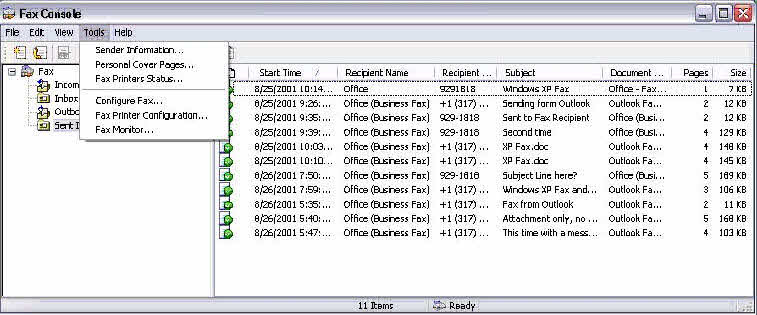 Figure 1
The Windows XP Fax Console. This is the only Inbox you’ll have for faxes in Windows XP because routing to your Outlook Inbox is no longer supported. You’ll manage all your fax files here, and you can now make all your fax configuration changes in one place (in the Tools Menu shown)’a real improvement over Windows 2000 Fax.
What’s Better
Integration with Outlook
So what’s the good news? Integration of the XP Fax Service with Outlook is a piece of cake compared to the contortions required to get the Windows 2000 Fax Service to work with Outlook. No longer must you change the logon of the fax service to an Administrator user account in order to access your Outlook profile. Like Windows 2000 Fax, the XP fax service uses the Windows Address Book (WAB) as its default address book for fax numbers. But as soon as you install Outlook 2000 or 2002, the XP fax service will automatically switch to using the Outlook Address Book (OAB) as its data source for fax addresses. Now all faxing operations from Office applications will invoke the OAB instead of the WAB, and you won’t have to try to maintain two address books. Say hallelujah!
Curiously, however, the option to change the logon account of the XP fax service from the Local System to a user account still appears in the Fax Service Logon Tab. Those of you who are accustomed to using this option to log the Fax Service on to an Outlook profile are in for a nasty surprise. Now if you change the logon to anything other than the local system you’ll disable the fax service, both from the local system and from Outlook. So don’t touch that dial! If one of your users who is attempting to fax reports this error message The requested operation cannot be completed. Check the connection to the fax printer and the fax printer configuration, chances are he’s changed the logon of the fax service. This inability to change the logon account for the Fax Service is a handicap for those who need to access individual user settings for such things as accessing calling card information. Microsoft’sworkaround for accessing calling card information will not work with XP Fax.
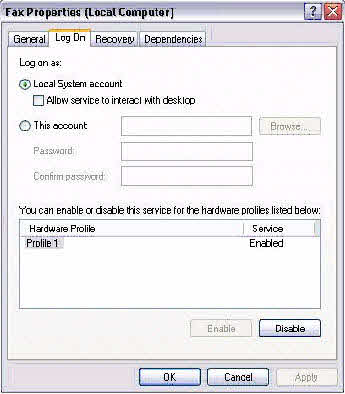 Figure 2
The Fax Service Properties Dialog. Don’t go there! Users familiar with Windows 2000 Fax are accustomed to using this dialog box to change the logon for the fax service. In Windows XP, however, you should not change the logon: you can now access your Outlook profile without changing the logon and the fax service can only run under the local system. Users who need to change the logon for other reasons are out of luck until Microsoft comes up with a solution.
Sending faxes from Outlook
All that is required to send faxes from Outlook is to include the Fax Mail Transport in your Outlook profile. You won’t exactly stumble upon the necessary steps to do so, however, because they’re not very intuitive. For Outlook 2002, go to Tools | E-mail Accounts | Add a new e-mail account | Additional Server Types | Fax Mail Transport. For Outlook 2000 (Corporate/Workgroup mode), go to Tools | Services and add the Fax Mail Transport there.
Configuration of the cover pages for use while sending faxes from Outlook is another feature that is hard to find. Use the respective paths above to find the Fax Mail Transport Service. Then in Outlook 2002 select Change or in Outlook 2000 select Properties to enable and configure the cover page option. The cover page list should include both predefined common cover pages and any personal cover pages you’ve created.
Sending faxes from Outlook is simply a matter of creating a new message and selecting a fax recipient from the OAB or Contacts Folder. The Help files state that in Outlook 2002 (which supports multiple transport types within one profile) it is necessary to specify the fax transport as the sending account from the Accounts dropdown in the new message window and that in Outlook 2000 it is necessary to move the fax transport to the top of the Delivery Order in Tools | Services. In fact, I have found that neither of these steps is necessary. Both versions of Outlook have no difficulty recognizing a fax address as such and invoking the correct transport for these messages no matter what mail transport you use (Exchange Server or Internet Mail). Even when sending a message to mixed recipient types (both e-mail and fax recipients), I’ve found that no adjustment of the delivery order or selection of the sending account is necessary. Outlook will send e-mail messages first, and then dial fax recipients in succession. If you have trouble sending from Outlook, however, you may want to try the recommendations to specify the sending account in advance or to adjust the delivery order of the transports.
Fax number format requirements for sending from Outlook follow the same conventions as in Windows 2000 Fax: Use either standard Outlook or international format in the contact record fax field. Use one-off format only when typing the number directly in the To: field or doing a merge.
No more blanks
The final improvement I’ve noticed in XP Fax is the elimination of an old nemesis that has been around since the early days of Microsoft Fax in Windows 95: the blank page that Outlook sends whenever you enable the cover page option. Since Outlook is not able to place a message in the Note section of a cover page, previous versions of the fax service have always sent a separate page to contain any note that the sender wrote. However, if the sender was faxing a document as an attachment from Outlook and wrote no note, Outlook still sent this page anyway as a blank. Users have been complaining about these mysterious blank pages for years. Finally, with Windows XP fax, this blank cover page is suppressed. If you fax a document as an attachment from Outlook but write no message, Outlook sends the cover page but no blank page follows for your non-existent note. If you send a document from an Office application to a fax recipient using the Send to Mail Recipient command and place a note in the Introduction field, than that note will appear above the first page of the document, not on a separate page. In either case, no blank pages are sent. Say hallelujah! By the way, should you be tempted to use the seemingly useful Send To | Fax Recipientcommand, resist that temptation. You’ll be in for a surprise. Read on.
Limitations
No More Routing to the Inbox or Delivery Notification
Are you ready for the bad news? It seems Microsoft can’t give us new features without taking others away. You can say farewell, for example, to the universal Inbox. Most veteran users of faxing from Outlook use Outlook so they can have a single repository for all their electronic (fax and e-mail) messages. Windows XP Fax no longer supports the routing of faxes to an Outlook Inbox. Microsoft did consider adding a feature to allow routing of faxes to an SMTP server, but later removed that feature. Received faxes can go only to the Inbox of the Fax Console (and to an additional system folder if you so desire), but not to Outlook. Sent faxes also reside in the Fax Console Sent Items folder, but if you’ve sent the fax from Outlook, a copy is also stored in Outlook’s Sent Items folder.
Also missing from Windows XP fax is a delivery confirmation notice routed to your Outlook Inbox. In fact, there is no option at all for delivery receipts for a local fax device. The only delivery notification you receive is a pop up balloon at the end of the transmission while the Fax monitor is still in the system tray. The only time you can get delivery receipts is when you are sending to a remote fax device that supports them. You can specify whether you want a single receipt when you send a fax to multiple recipients and if you want a copy of the sent fax attached to the delivery receipt. These options are set in the Tools | Microsoft Fax Attributes menu in the new message window of Outlook.
No Sharing
One feature we were all hoping would appear with the XP fax service has remained notably absent, sharing of the fax service.
Fax Merges
Other missing features fall into the category of deficiencies of the Windows 2000 Fax service that Microsoft did not address in this release. Fax merges, for example, require the the fax number in the contact record top be in one-off format. Microsoft now acknowledges that idiosyncrasy and provides a workaround. The message format needs to be in HTML if you want to avoid the email security prompts from Outlook 2002 or patched versions of Outlook 2000. The fax service still does not place a ‘fax recipient’ option in Word for a merge. You must still merge to an e-mail recipient.
Old Annoyances
Other annoyances from Windows 2000 persist as well. The ability to specify faxing options on a per message basis for a fax message sent from Outlook using the Tools | Microsoft Fax Attributes menu is still missing when Word is the editor, ironic since Word is Outlook’s default mail editor in Outlook 2002. And the old Microsoft Fax Wizard still appears whenever you try to fax from an Office application using the Send To | Fax recipient command. If you use this option, you’ll get to send two faxes: the first will contain your default cover page plus the cover page the Microsoft Fax Wizard creates. The second will again contain your default cover page and the document you intended to fax in the first place. You should use theSend To | Mail recipient option instead to send through Outlook or print to the Fax Printer to send via the Send Fax Wizard. Remember that the wizard is now particularly useful since you have full access to your Outlook Address Book instead of the WAB.
More Information
- Windows XP-Based Fax Service Not Transferring Faxes to Outlook — The "resolution" in this article says that if you want to see WinXP faxes in your Inbox, you need to create a message, insert the fax as a file, and send the message to yourself. It would be easier just to drag the file into the Inbox?
- Fax4Outlook — improves integration between Outlook/Office and the fax service in Windows 2000/XP
XP PCs is limited half-open.com
http://www.thaiadmin.org/board/index.php?topic=151387.0
http://half-open.com/
Half-open limit fix is a program designed to change the maximum number of concurrent half-open outbound TCP connections (connection attempts) in the Windows system tcpip.sys file.
Microsoft first introduced this limit in Windows XP SP2 and it is present in later versions, which purpose is to try to slow the spread of virus and malware from system to system, and also to reduce the impact of infected systems participating in DoS (Denial of Service) attacks.
Microsoft's limiter makes it impossible for Windows systems to have more than 10 concurrent half-open outbound connections; after 10, new connection attempts are put in a queue and forced to wait. Thus, the speed of connection to other PCs is limited.Therefore, the speed of connection to other computers is actually limited. This happens regardless of whether you're using DSL, ethernet or a cable broadband internet service provider.
P2P (peer-to-peer) software like µTorrent, BitComet, eMule, P2P TV, etc., are generally the programs mostly affected. Since bittorrent apps tend to use up all 10 of the half-open connections, other Internet activity—especially the loading of web pages—can become extremely slow. The delay before opening a new page can take over ten seconds: this delay occurs regardless of your Internet connection speed.
Half-open limit fix remedies this problem by increasing the maximum limit of half-open connections. For most Internet users, changing the limit to 100 will be more than sufficient.
http://half-open.com/
Half-open limit fix is a program designed to change the maximum number of concurrent half-open outbound TCP connections (connection attempts) in the Windows system tcpip.sys file.
Microsoft first introduced this limit in Windows XP SP2 and it is present in later versions, which purpose is to try to slow the spread of virus and malware from system to system, and also to reduce the impact of infected systems participating in DoS (Denial of Service) attacks.
Microsoft's limiter makes it impossible for Windows systems to have more than 10 concurrent half-open outbound connections; after 10, new connection attempts are put in a queue and forced to wait. Thus, the speed of connection to other PCs is limited.Therefore, the speed of connection to other computers is actually limited. This happens regardless of whether you're using DSL, ethernet or a cable broadband internet service provider.
P2P (peer-to-peer) software like µTorrent, BitComet, eMule, P2P TV, etc., are generally the programs mostly affected. Since bittorrent apps tend to use up all 10 of the half-open connections, other Internet activity—especially the loading of web pages—can become extremely slow. The delay before opening a new page can take over ten seconds: this delay occurs regardless of your Internet connection speed.
Half-open limit fix remedies this problem by increasing the maximum limit of half-open connections. For most Internet users, changing the limit to 100 will be more than sufficient.
Operating system:
Windows XP SP1(x64)/SP2(x86,x64)/SP3, Vista without SP(x86,x64) and with
SP1(x86,x64), 7 beta(x86,x64).
Interface language: English, Arabic, Armenian, Bengali, Chinese (Simplified and Traditional), Czech, Estonian, French, German, Greek, Hebrew, Italian, Japanese, Korean, Lithuanian, Norwegian, Polish, Portuguese (Brazilian and European), Romanian, Russian, Spanish, Swedish, Thai, Turkish, Ukrainian and Vietnamese.
Size: 360KB.
Version: 4.2.
Interface language: English, Arabic, Armenian, Bengali, Chinese (Simplified and Traditional), Czech, Estonian, French, German, Greek, Hebrew, Italian, Japanese, Korean, Lithuanian, Norwegian, Polish, Portuguese (Brazilian and European), Romanian, Russian, Spanish, Swedish, Thai, Turkish, Ukrainian and Vietnamese.
Size: 360KB.
Version: 4.2.
Instruction:
1) Run Half-open limit fix
2) Choose a new limit of concurrent half-open outbound connections quantity and press "Add to tcpip.sys" (for most Internet users, changing the limit to 100 will be more than sufficient)
3) Restart computer and enjoy
Running the program again may be required if Windows updates tcpip.sys, such as when a new SP is released. If program ceases to work on an updated tcpip.sys file, a new version will be available at this site.
To recover data on your hard drive that has been changed by the program just press "Restore original file".
1) Run Half-open limit fix
2) Choose a new limit of concurrent half-open outbound connections quantity and press "Add to tcpip.sys" (for most Internet users, changing the limit to 100 will be more than sufficient)
3) Restart computer and enjoy
Running the program again may be required if Windows updates tcpip.sys, such as when a new SP is released. If program ceases to work on an updated tcpip.sys file, a new version will be available at this site.
To recover data on your hard drive that has been changed by the program just press "Restore original file".
Vista and Windows 7
users: Perhaps in the future,
after updating Windows or installing a new Service Pack, a "Test
mode" watermark may appear. It may appear because in all versions of Vista
and Windows 7 (except in Vista x86 without SP1) there is the imposing drivers
signature check, and the tcpip.sys file sign with test signature after
patching. In such case, it should only require a simple re-installation of the
program to remove the watermark.
วันอังคารที่ 4 พฤศจิกายน พ.ศ. 2557
พอร์ทไม่เปิด ดูกล้องผ่านเนตไม่ได้ เพราะปัญหาจาก LS Nat ของ ISP
ที่มา http://cctvhire.me/%E0%B8%84%E0%B8%A7%E0%B8%B2%E0%B8%A1%E0%B8%A3%E0%B8%B9%E0%B9%89/forward-port-ddns-dlink-dsl-2750e-router-config/
ที่มา.
ผมคิดอยู่นานว่าจะเขียนบทความนี้ไหม เนื่องจากมันอาจไม่ใช่ปัญหาที่เจอบ่อย แต่กับลูกค้ารายล่าสุดเป็นรายที่สองแล้วที่ผมเจอปัญหานี้ ผมจึงตัดสินใจที่จะเขียน เพื่อเป็นแนวทางในการแก้ปัญหากับคนทำกล้องวงจรปิดทุกคน
อย่างที่ทราบกันดีว่า เทคโนโลยีอินเทอร์เน็ตตามบ้านในไทย ส่วนใหญ่จะเป็น ADSL ใช้คู่สายโทรศัพท์ ส่วนรายละเอียดทางเทคนิคว่ามันทำงานอย่างไร ท่านสามารถหาอ่านได้ตามอินเทอร์เน็ต แต่จุดที่ผมต้องการจะเน้นเป็นหลักก็คือ เรื่อง Public IP หรือที่เรียกกันว่า “ไอพีจริง” นั้นเอง
ADSL ตามบ้านทั่วไปในไทย ผู้ให้บริการ (ISP) จะใช้วิธี Random ตัวไอพีจริงอยู่ตลอด กล่าวคือ หากคุณปิดและเปิดโมเด็มเราเตอร์ขึ้นมาใหม่ คุณจะได้รับหมายเลขไอพีจริงตัวใหม่ ซึ่งเหตุผลที่ทำแบบนี้ เนื่องจากหมายเลขไอพีจริงที่ใช้กัน (IPv4) มีจำนวนจำกัด ความต้องการก็เพิ่มขึ้นทุกปี ทำให้ผู้ให้บริการต้องบริหารเลขไอพีให้เกิดประโยชน์และสร้างรายได้กับเขามากที่สุด หากลูกค้าไม่อยากให้ Random IP ลูกค้าจำเป็นต้องซื้อแพ็คเกจแบบ “Fix IP” ซึ่งมีราคาสูงกว่าแพ็คเกจธรรมดาพอสมควร
จนกระทั่งมาถึงปัจจุบัน อย่างที่บอกไปว่า ผู้ให้บริการต้องบริหารเลขไอพีให้เกิดประโยชน์ต่อเขามากที่สุด(แต่เดือดร้อนลูกค้า) เขาจึงงัดวิธีการใหม่ขึ้นมา ที่ชื่อว่า “Large Scale NAT” ซึ่งก่อนที่จะทำความเข้าใจกับคำๆนี้ คุณต้องรู้เสียก่อนว่า NAT มันคืออะไร อธิบายง่ายๆมันคือ กระบวนการแปลงเลขกลับไปมาระหว่าง Public IP เป็น Private IP แล้วทำไมต้องแปลง? เพื่อให้อุปกรณ์ทั้งหลายของคุณที่บ้าน ไม่ว่าจะเป็น PC, Nootbook, Smartphone, Smart TV, DVR สามารถออกอินเทอร์เน็ตได้ด้วย Public IP เพียงหมายเลขเดียว ซึ่งพระเอกที่ทำหน้าที่ NAT ก็คือโมเด็มเราเตอร์นั้นเองครับ การทำ Large Scale NAT ก็จะคล้ายกับการทำ NAT ของโมเด็มเราเตอร์ แต่จะเป็นระดับที่สูงขึ้นมา กระทำโดยอุปกรณ์เครือข่ายของผู้ให้บริการที่ซ้อนขึ้นมาอีกที หากไม่เข้าใจลองดูรูปเปรียบเทียบครับ
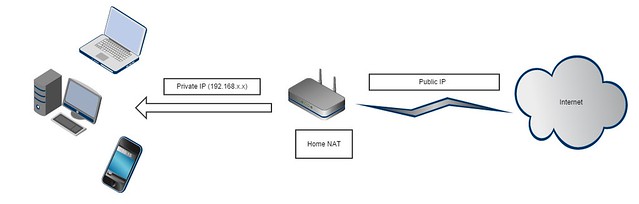
NAT ตามบ้านทั่วไป
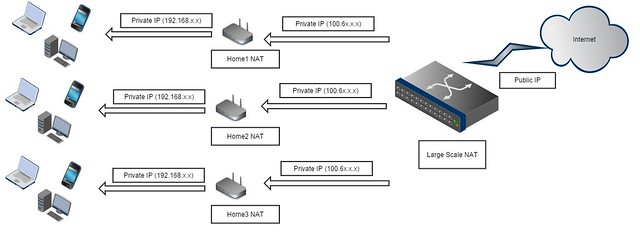
Large Scale NAT ตัวปัญหา
เป็นไงครับ แสบไหมครับ…
ที่นี้คำถามต่อมา คนทำกล้องวงจรปิดอย่างเราจะรู้ได้ไงว่าเจอปัญหานี้เข้าแล้ว? ง่ายนิดเดียว ผมมีวิธีแก้ปัญหาครับ
1. เชื่อมต่ออินเทอร์เน็ตกับโมเด็มเราเตอร์ แล้วเข้าเว็บ myipaddress.com ตรวจสอบว่าเลขไอพีที่เห็นกับที่เมนู status โมเด็มเราเตอร์ตรงกันหรือไม่ ถ้าไม่ตรง เป็นไปได้ที่จะเป็น Large Scale NAT 90% แล้วครับ
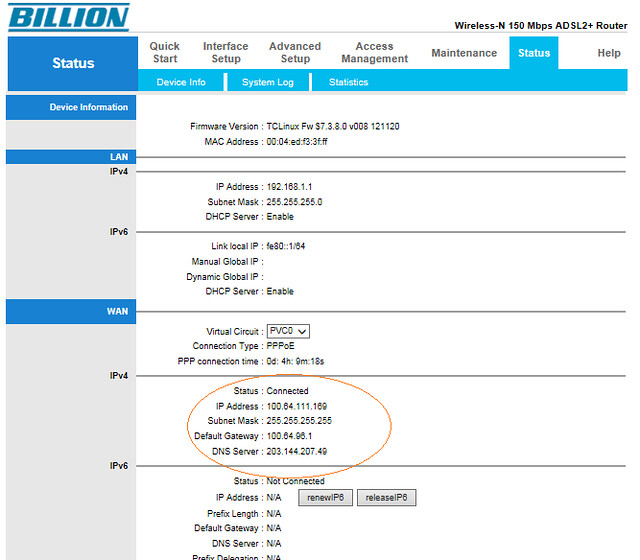
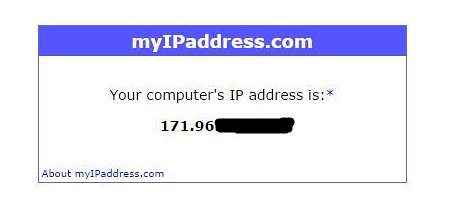
2. เพื่อความแน่ใจ ให้ดูต่อว่าเลขไอพีที่เมนู status ที่โมเด็มเราเตอร์ ว่าใช่เลขประมาณ 100.6x.x.x หรือไม่ ถ้าใช่ก็ 100% ครับ
3. วิธีแก้ไข โทรครับ โทรไปหาผู้ให้บริการ แล้วบอกให้เขาปลดให้ เขาจะบอกให้คุณเปิดปิดโมเด็มหนึ่งครั้ง แล้วลองดูใหม่ครับ ต้องได้ไอพีจริงแล้ว
เอาหละครับ หวังว่าบทความนี้จะเป็นประโยชน์แก่ทุกท่านไม่มากก็น้อย
ขอขอบคุณข้อมูลจาก https://www.blognone.com/node/54298 ทีทำให้ผมแก้ปัญหาตรงจุดนี้ได้ครับ ขอบคุณมากๆ
สมัครสมาชิก:
บทความ (Atom)