วันพฤหัสบดีที่ 2 เมษายน พ.ศ. 2558

ใช้ vlc แปลง ไฟล์ และ rotation

http://www.wintips.org/how-to-rotate-and-save-a-video-using-vlc-media-player/

*** ให้กำหนดมุม ที่ angle ไม่ใช่ ที่ transform  ถึงจะส่งผล ต่อ out put stream และ save ได้


Maybe you have captured a video with your cellphone or camcorder and when you try to play it in your computer, you discover that it is rotated 90 degrees. This error happens because many cellphones don't understand the orientation. 
When you have a rotated video, you can use two free programs to rotate and save you video in the orientation you want: VLC Media Player and Windows Live Movie Maker. This tutorial guides you on how to use VLC Media Player to rotate and save your videos.
* Click here to see a detailed video on how to rotate and save a video using VLC media player (Ver 2.0.2).
Note – Update: The method bellow is working great with VLC Media Player Ver 2.0.2. If you want to use the latest VLC Media Player (Ver. 2.1.2) to rotate your videos then navigate to this link : How to Rotate Video using VLC Media Player ver 2.1.2
1. First download and install VLC Media Player from here : http://www.videolan.org/
2. Then choose your rotated video from your computer and "right click" to open it with VLC Media Player
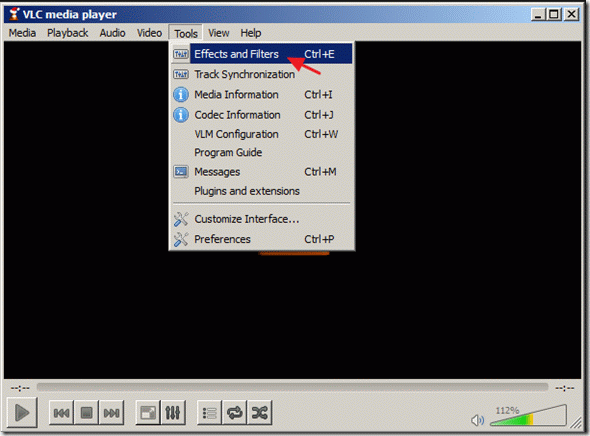
3. In the VLC Media Player main menu go "Tools" > "Effects and Filters"
image
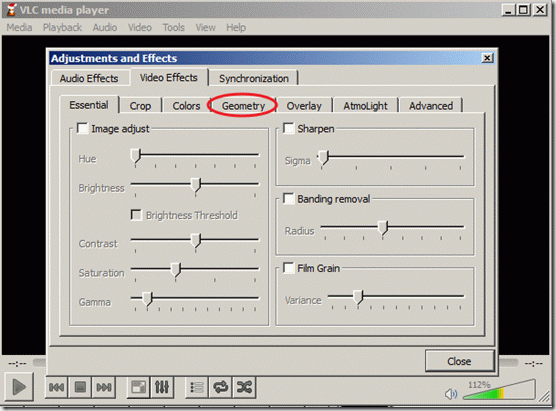
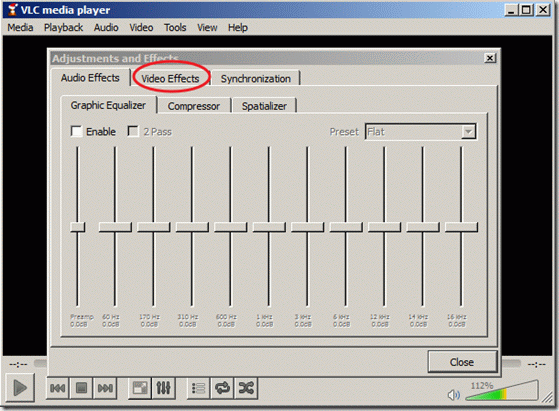
4. In "Adjustments and Effects" window, choose the "Video Effects" tab
image
5. In "Video Effects" tab, choose "Geometry"
image
6. In "Geometry" click the "Transform" box to enable transform and make sure that the "Rotate by 90 degrees" setting below is selected.  Then choose "Close" to close the window. Notice*: The "Rotate by 90 degrees" setting, rotates your video by 90 degrees clockwise. If you want to rotate your video in a different angle then choose the corresponding angle.image
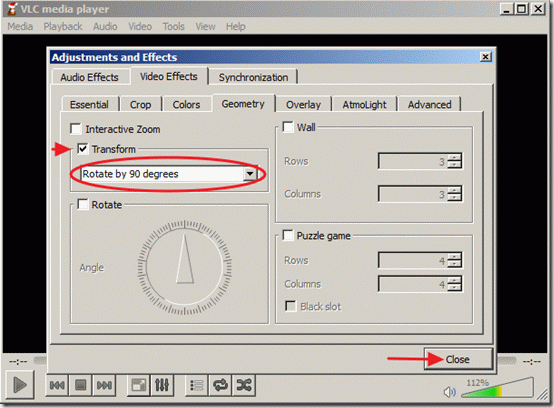
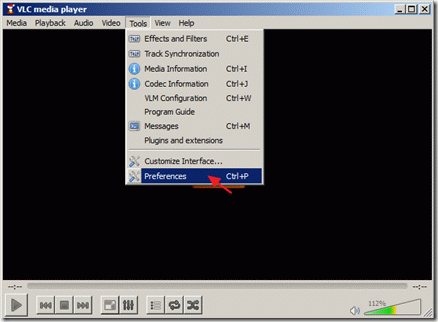
Now you can view and play your rotated video with VLC Media player (only) in the right angle. 7. If you like to save your recent rotated video, from the main menu go to "Tools" > "Preferences"
image
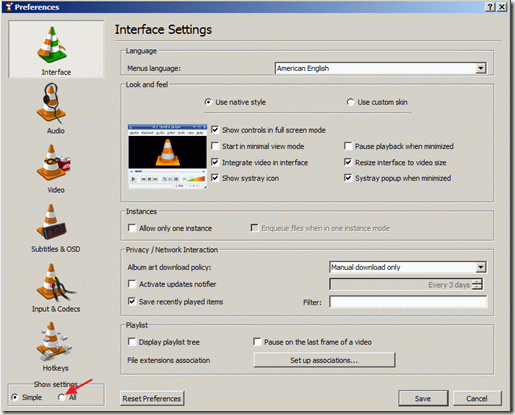
 8. In Interface Settings look at the left side's bottom and choose to "Show All Settings"
image
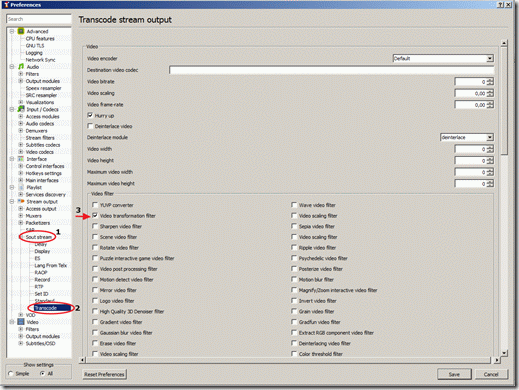
 9. At the left pane under "Stream Output" expand "Sout stream" >"Transcode" and at right pane under "Video filter" choose the "Video transformation filter". Then click "Save" to save your settings.
image
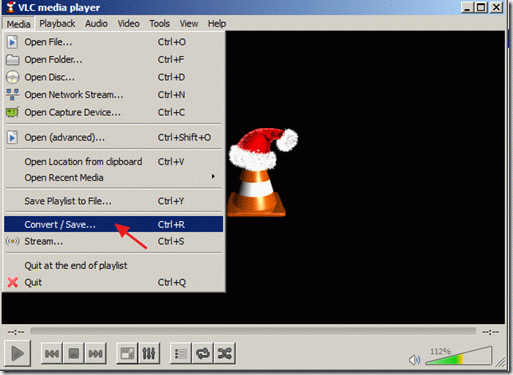
 10. From the main menu choose "Media" > "Convert / Save"
image
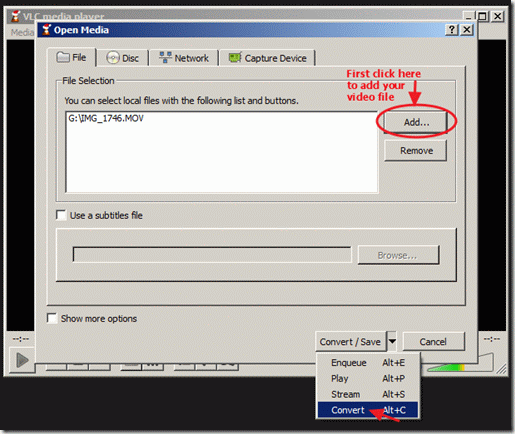
 11. At "Convert/Save" options at "File" tab, choose "Add…" to add your recently rotated video file and then press the drop-down arrow on the right of "Convert / Save" button to choose "Convert"
image
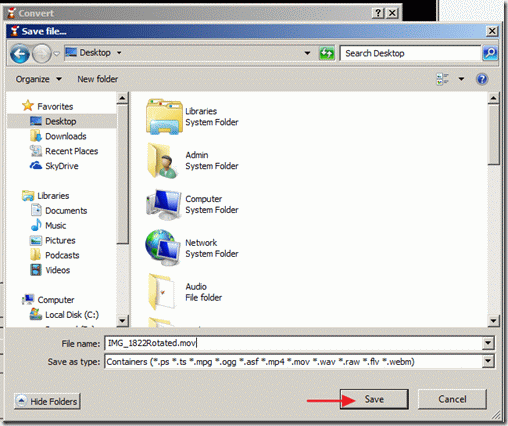
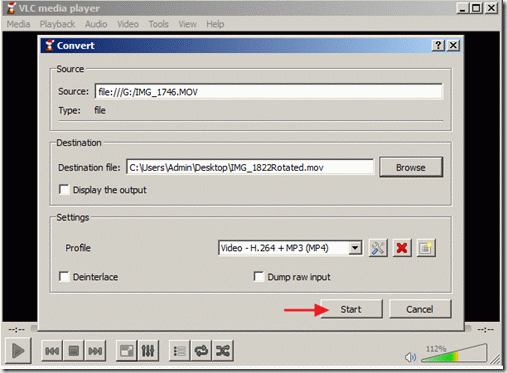
 12. At "convert" options, choose "Browse", select the destination folder (e.g. "Desktop"), give a file name for the converted file (e.g. "IMG_1822Rotated") and specify the output video file type (e.g. ".MOV")
image
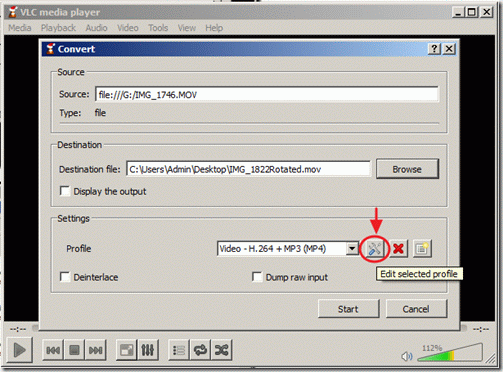
 13. While in "convert" options, choose your profile output: "Video – H.264 + MP3 (MP4)" and then press the "Tools" button on the right side to edit the selected profile.
image
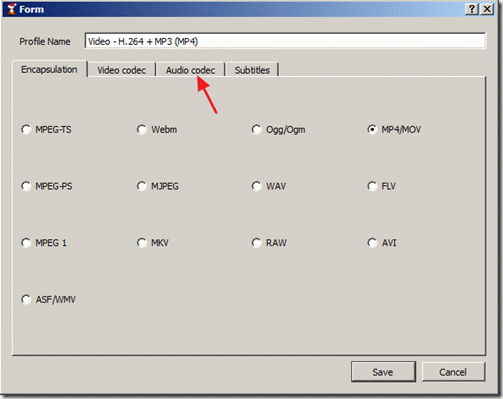
 14. In profile settings, find and click the "Audio codec" tab
image
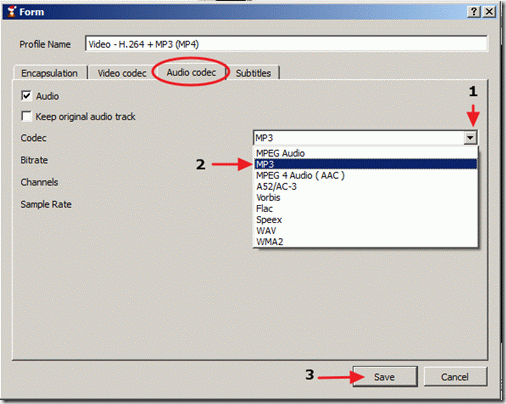
 15. Inside "Audio codec" settings use the drop-down arrow in codec's line and from the list of codecs choose "MP3". Then click Save.
image
 16. In "Convert" window press "Start" to start the conversion.
image
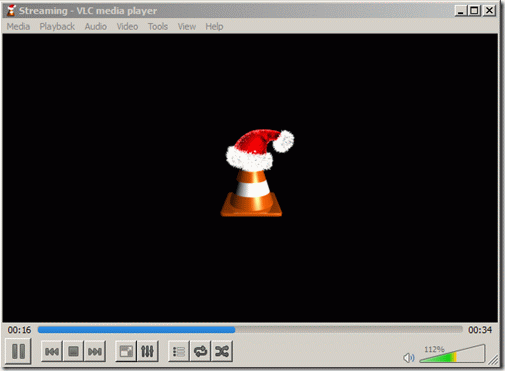
 17.As "Conversion/Streaming" process is executed, you see the following screen.
image
18. When  the "Conversion/Streaming" process is completed, you can play your video in any media player you like.
Attention: After you rotate and save your videos, you must reset VLC player to it's default settings , by going to: "Tools" > "Preferences" and press the "Reset Preferences" button at the bottom side of Preferences window.
How to rotate and save a video using VLC media player (Video tutorial)
xp ไป ws2012 customer database เซต nic teaming , intel pro/1000 mt 2 Gb , load balance ,asp classic,raid level

สรุป ขั้นตอนย้าย เซฟเวอร์จาก xp ไป ws2012 (เพื่อทดสอบเท่านั้น)


-สิ่งที่ย้ายไป  ระบบ svr tsr  stock search  จาก ระบบ web service  iis5.1 รองรับการค้นหาผ่านเวป ให้กับเวปการจัดการของบริษัทฯ(เวปเขียว) และ dbs customer (grandpc_wxx.mxx)
-สิ่งที่ต้องการ ใน ws2012 
*ต้องการ fast database อาจไปประยุกด์ app service
*ระบบรองรับ multiuser จำนวนมาก ในเวลาเดียวกัน
เมื่อใช้คำสั่ง net config server  สำหรับ xp จะได้ด้านล่าง

Server hidden                         No
Maximum Logged On Users               10
Maximum open files per session        16384

แต่ถ้าใน ws2012 จะได้  16ล้าน ใน  Maximum Logged On Users

*รองรับ load balance ,fault tolerance ,Link Aggregation  2 gigabit ใช้ intel pro/1000 mt  รองรับ ieee 802.3ad dynamic link aggregation

-สิ่งที่ควรรู้
- f12 เข้า bios backup *.adi ด้วย activedisk@image kkdminiw8.1 ส่ง image ไป ext harddisk
-การ set nic teaming (LBFO)  สำหรับ ws2012 มาแทน ANS Teams และ fail over ของ ws2008
 รายละเอียดดุได้ที่  http://www.intel.com/support/network/sb/cs-009747.htm

Windows Server 2012 adds support for NIC teaming, also known as Load Balancing and Failover (LBFO). Intel ANS teaming and VLANs are not compatible with Microsoft LBFO teams. Intel® PROSet blocks a member of an LBFO team from being added to an Intel ANS team or VLAN. Do not add a port that is part of an Intel ANS team or VLAN to an LBFO team. Adding a port can cause system instability.
If you use an Intel® ANS team member or VLAN in an LBFO team, do the following procedure to restore your configuration:
  1. Reboot the server.
  2. Remove LBFO team. Even though LBFO team creation failed, after a reboot the Server Manager reports that LBFO is Enabled. The LBFO interface is present in the NIC Teaming GUI.
  3. Remove the Intel® ANS teams and VLANS involved in the LBFO team and recreate them. This step is optional but strongly recommended. All bindings are restored when the LBFO team is removed.
NoteIf you add an Intel AMT enabled port to an LBFO team, do not set the port to Standby in the LBFO team. If you set the port to Standby you can lose AMT functionality.
-การเซตค่าต่างๆ

 เร่ิ่มเตรียมระบบ ws2012
-ด้วยสเปค


โดยแบ่ง เป็น 2 partition c: และ d: เมื่อทำ raid0 บน 2 ssd  จะได้ ความเร็วและพื้นที่ แต่ไม่มี data protect (no mirror)

ถ้าให้ดีต้องทำ raid 10 ไปเลย แต่ ต้อง 4 ssd ขึ้นไป จะได้ Protect และ Read/Write Perfomance ด้วย กด Ctrl+I เข้าไปเซต raid หลังเปิดเครื่อง
บทความนี้ใช้ ssd *2 ทำ raid 0 ไปก่อน ลองทดสอบความเร็ว ซึ่งในระบบ backbone ของบริษัท ได้วาง giga switch ไว้แล้ว มีเครื่องลูกประมาณ 20 เครื่อง แบบ workgroup แต่ถ้าอยากต้องการความเร็วที่แท้จริง ควรวางสาย cat6(มีกระดูกในสาย) แท้ไปเลย  จะเห็นความเร็วได้ชัด(ทดสอบจากการค้นหารายชื่อในฐานข้อมูล ทำความเร็วได้แตกต่างจากเดิมมาก คือค้นหาได้เร็วขึ้นอย่างชัดเจน หลังจากเซตระบบทั้งหมดแล้ว เช่น Teaming featuer 2Gb)


ข้อมุลการติดตั้ง raid level ที่รองรับ จากคู่มือของ mainboard


-ลง ระบบ ws2012 datacenter r2 64bit  เมื่อลงเรียบร้อยแล้ว
*ก่อนให้ disable lan onboard ก่อน
ให้ทำการเซต nic teaming  ปกติไดรเวอร์จะลง ans service ให้เอง เราต้องเอา ans service นี้ออกก่อน ถึงจะใช้ nic teaming ใน ws2012 ได้ ก็โดย รัน swtools ใน ไดรฟ c: เรียนไดร์เวอร์ setup ของมันขึ้นมา เอา ติ๊กถูกออก และให้ รีสตารท์ หลังจากนั้น กำหนด NIC Team ที่ local server ได้ในหน้า sever manager ได้เลย ตั้งใช้ teaming ให้ enable


-ลง web service iis8.5

โดยเข้าไปกำหนดใน role แล้วเลือกติดตั้ง iis8.5 และ asp ถ้าเวปเดิมของเรา เขียนด้วย asp classic


ทำการ copy โฟลเดอร์ database ของเรา ไป เช่น findendpromise  ไปไว้ ที่ d:\ แล้วทำ findendpromise 
*ตั้ง mime-type  *.asp และ *.asa และ กำหนดให้ debug ได้ และ กำหนด set parent ให้ใช้งานได้ (คือ "
..")
*ให้ access ได้โดย iis โดยให้ตั้ง สิทธิ การเข้าถึงไปกับ IUSR   เหมือนตั้งสิทธิการแชร์ทั่วไป ใน แทป sercurity
*เข้า iis server manager กำหนดให้ 32bit application ให้ enable ให้ app pool เพือใช้งาน database ได้ 
*ทำ virtul directory ให้กับ findendpromise เพื่อกำหนด root ของ site ใหม่ 
*กำหนด port forward ที่  binding  และเซต firewall เข้าไปที่ allow port ที่ advandce firewall  ถ้าเราต้องการให้ รีโมตเข้ามาใช้งานได้
*ในส่วน ของ Offline Program (เช่น โปรแกรม Findendpromise ) กำหนด user และ รหัสผ่าน ให้เข้าถึง database ให้กับโฟลเดอร์ findendpromise ที่ เซฟเวอร์  โดย app findendpromise ที่ เครื่องclient ได้ (จุดนี้ findendpromise client จะสร้าง user และ passwd ขึ้นมา ให้เอง และจะ log out  user ให้เมื่อปิด findendpromsie client)
ws2012 ตัวใหม่ (ทำไว้เพื่อกรณีศึกษาเท่านั้น) ทำหน้าที่ customer database server

switching gigabit + สาย cat5e และ cat6 ผสมกัน + 2 adsl ทำ load balance กัน ใช้net ทั้งของ 3bb และ true

box server เก็บ data ทั้งของ บริษัทและ user

freenas server เก็บข้อมูล bittor, ubuntu server เป็น proxy server และ ใช้ทำ load balance , forward port ,firewall

cctv server เก้บ ข้อมุลกล้อง+remote ดุผ่าน pcและ มือถือ

customer database ทดสอบตัวใหม่ตามบทความที่เขียน


rdp server  และ ipcamera server เก้บข้อมุล clip ipcamera ดู่ผ่าน pc และ มือถุือ

xp server ตัวเก่าใช้มา มากกว่า 7 ปี ฮารด์ดิส 1 ide interface เพียวๆสุดทน แค่เปลี่ยน แรม2g กับ psu