Once again we have Russ Valentine, Outlook MVP and cardiologist, who dwells in the Land of Fax every day, to thank for working through the oddities of a new fax program.
Windows XP Fax is the latest iteration of Windows 2000 Fax and its predecessor, NT Personal Fax (a popular technical preview that never saw the light of day but is still in use today by those who can find it). I took this new fax program out for a spin to see what’s new. As usual, there’s both good news and bad news to report. Microsoft both giveth and it taketh away. I’m here to show you what’s better, what’s not, and how to make the most out of using this new fax service with Outlook.
Setup and Configuration
You can only install Windows XP Fax by using the Add/Remove Windows Component utility in Control Panel. That gives you the chance first to make sure your fax modem is installed and configured correctly and thereby avoid many of the ‘misses’ that occurred with Windows 2000 Fax installation. All you need to do to install Windows XP Fax is point the installation routine to the source for your XP installation files.
The Fax Configuration Wizard will start the first time you access any of the fax functions from the Start menu. Here you can set up your basic fax functions. Configuration of XP Fax is much simpler and more intuitive than it was in Windows 2000. For example, you can enable fax reception in this wizard rather than following the nearly undiscoverable path that was necessary in Windows 2000. Installing the fax service creates a fax printer automatically and in its properties you can configure the rest of your faxing options, such as how you’d like the Fax Monitor to behave. Many users have complained that the Fax Monitor fails to appear in the system tray to allow quick access to the fax service, but its absence is all part of Windows XP’s clean-up of the desktop. The Fax Monitor will only appear in the system tray when a transmission or reception is in progress. If you have manual reception enabled, the Fax Monitor will pop up automatically to allow you to answer an incoming fax call.
For users who upgrade from Windows 9x and are using Microsoft Fax, Windows XP Fax replaces Microsoft Fax. An upgrade saves device configuration, providing that you have only one device before the upgrade and one device after the upgrade. Upgrading also saves sender information and cover pages. You can access existing Microsoft Fax archives using the Microsoft Exchange client you used before the upgrade, but you cannot import archived faxes using the Windows XP Fax Console. Following upgrade, when you open an archived fax from your mail application it opens in TIFF format with Image Preview, the Windows XP image viewer.
For users upgrading from Windows 2000 who are using the Windows 2000 Fax Service, Windows XP Fax replaces it. Upgrading saves both device configuration and sender information. Cover pages are available after upgrading. Windows 2000 Fax archives can be imported into the Windows XP Fax Console (File | Import).
Usage
As in Windows 2000 Fax, the Send Fax Wizard is XP Fax’s native sending utility. You invoke it when you select the "Send a Fax”‘ program from the Start menu. It can only send a fax on a Cover Page. It advises you that if you want to send a document instead, you should use the Print to Fax routine from the document’s application. Neither of these faxing options uses Outlook for sending the fax. In XP Fax the Fax Console is now the hub for faxing operations. Here you can manage incoming, outgoing and archived faxes. You can make or revise all your configuration settings in this one place rather than having to make them in several locations as you did in Windows 2000.
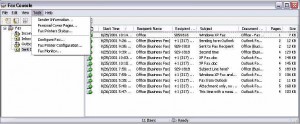
The Windows XP Fax Console. This is the only Inbox you’ll have for faxes in Windows XP because routing to your Outlook Inbox is no longer supported. You’ll manage all your fax files here, and you can now make all your fax configuration changes in one place (in the Tools Menu shown)’a real improvement over Windows 2000 Fax.
What’s Better
Integration with Outlook
So what’s the good news? Integration of the XP Fax Service with Outlook is a piece of cake compared to the contortions required to get the Windows 2000 Fax Service to work with Outlook. No longer must you change the logon of the fax service to an Administrator user account in order to access your Outlook profile. Like Windows 2000 Fax, the XP fax service uses the Windows Address Book (WAB) as its default address book for fax numbers. But as soon as you install Outlook 2000 or 2002, the XP fax service will automatically switch to using the Outlook Address Book (OAB) as its data source for fax addresses. Now all faxing operations from Office applications will invoke the OAB instead of the WAB, and you won’t have to try to maintain two address books. Say hallelujah!
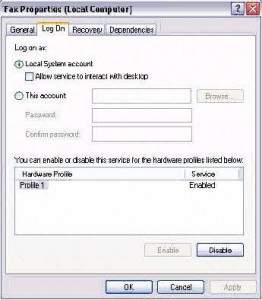
Curiously, however, the option to change the logon account of the XP fax service from the Local System to a user account still appears in the Fax Service Logon Tab. Those of you who are accustomed to using this option to log the Fax Service on to an Outlook profile are in for a nasty surprise. Now if you change the logon to anything other than the local system you’ll disable the fax service, both from the local system and from Outlook. So don’t touch that dial! If one of your users who is attempting to fax reports this error message The requested operation cannot be completed. Check the connection to the fax printer and the fax printer configuration, chances are he’s changed the logon of the fax service. This inability to change the logon account for the Fax Service is a handicap for those who need to access individual user settings for such things as accessing calling card information. Microsoft’sworkaround for accessing calling card information will not work with XP Fax.
The Fax Service Properties Dialog. Don’t go there! Users familiar with Windows 2000 Fax are accustomed to using this dialog box to change the logon for the fax service. In Windows XP, however, you should not change the logon: you can now access your Outlook profile without changing the logon and the fax service can only run under the local system. Users who need to change the logon for other reasons are out of luck until Microsoft comes up with a solution.
Sending faxes from Outlook
All that is required to send faxes from Outlook is to include the Fax Mail Transport in your Outlook profile. You won’t exactly stumble upon the necessary steps to do so, however, because they’re not very intuitive. For Outlook 2002, go to Tools | E-mail Accounts | Add a new e-mail account | Additional Server Types | Fax Mail Transport. For Outlook 2000 (Corporate/Workgroup mode), go to Tools | Services and add the Fax Mail Transport there.
Configuration of the cover pages for use while sending faxes from Outlook is another feature that is hard to find. Use the respective paths above to find the Fax Mail Transport Service. Then in Outlook 2002 select Change or in Outlook 2000 select Properties to enable and configure the cover page option. The cover page list should include both predefined common cover pages and any personal cover pages you’ve created.
Sending faxes from Outlook is simply a matter of creating a new message and selecting a fax recipient from the OAB or Contacts Folder. The Help files state that in Outlook 2002 (which supports multiple transport types within one profile) it is necessary to specify the fax transport as the sending account from the Accounts dropdown in the new message window and that in Outlook 2000 it is necessary to move the fax transport to the top of the Delivery Order in Tools | Services. In fact, I have found that neither of these steps is necessary. Both versions of Outlook have no difficulty recognizing a fax address as such and invoking the correct transport for these messages no matter what mail transport you use (Exchange Server or Internet Mail). Even when sending a message to mixed recipient types (both e-mail and fax recipients), I’ve found that no adjustment of the delivery order or selection of the sending account is necessary. Outlook will send e-mail messages first, and then dial fax recipients in succession. If you have trouble sending from Outlook, however, you may want to try the recommendations to specify the sending account in advance or to adjust the delivery order of the transports.
Fax number format requirements for sending from Outlook follow the same conventions as in Windows 2000 Fax: Use either standard Outlook or international format in the contact record fax field. Use one-off format only when typing the number directly in the To: field or doing a merge.
No more blanks
The final improvement I’ve noticed in XP Fax is the elimination of an old nemesis that has been around since the early days of Microsoft Fax in Windows 95: the blank page that Outlook sends whenever you enable the cover page option. Since Outlook is not able to place a message in the Note section of a cover page, previous versions of the fax service have always sent a separate page to contain any note that the sender wrote. However, if the sender was faxing a document as an attachment from Outlook and wrote no note, Outlook still sent this page anyway as a blank. Users have been complaining about these mysterious blank pages for years. Finally, with Windows XP fax, this blank cover page is suppressed. If you fax a document as an attachment from Outlook but write no message, Outlook sends the cover page but no blank page follows for your non-existent note. If you send a document from an Office application to a fax recipient using the Send to Mail Recipient command and place a note in the Introduction field, than that note will appear above the first page of the document, not on a separate page. In either case, no blank pages are sent. Say hallelujah! By the way, should you be tempted to use the seemingly useful Send To | Fax Recipientcommand, resist that temptation. You’ll be in for a surprise. Read on.
Limitations
No More Routing to the Inbox or Delivery Notification
Are you ready for the bad news? It seems Microsoft can’t give us new features without taking others away. You can say farewell, for example, to the universal Inbox. Most veteran users of faxing from Outlook use Outlook so they can have a single repository for all their electronic (fax and e-mail) messages. Windows XP Fax no longer supports the routing of faxes to an Outlook Inbox. Microsoft did consider adding a feature to allow routing of faxes to an SMTP server, but later removed that feature. Received faxes can go only to the Inbox of the Fax Console (and to an additional system folder if you so desire), but not to Outlook. Sent faxes also reside in the Fax Console Sent Items folder, but if you’ve sent the fax from Outlook, a copy is also stored in Outlook’s Sent Items folder.
Also missing from Windows XP fax is a delivery confirmation notice routed to your Outlook Inbox. In fact, there is no option at all for delivery receipts for a local fax device. The only delivery notification you receive is a pop up balloon at the end of the transmission while the Fax monitor is still in the system tray. The only time you can get delivery receipts is when you are sending to a remote fax device that supports them. You can specify whether you want a single receipt when you send a fax to multiple recipients and if you want a copy of the sent fax attached to the delivery receipt. These options are set in the Tools | Microsoft Fax Attributes menu in the new message window of Outlook.
No Sharing
One feature we were all hoping would appear with the XP fax service has remained notably absent, sharing of the fax service.
Fax Merges
Other missing features fall into the category of deficiencies of the Windows 2000 Fax service that Microsoft did not address in this release. Fax merges, for example, require the the fax number in the contact record top be in one-off format. Microsoft now acknowledges that idiosyncrasy and provides a workaround. The message format needs to be in HTML if you want to avoid the email security prompts from Outlook 2002 or patched versions of Outlook 2000. The fax service still does not place a ‘fax recipient’ option in Word for a merge. You must still merge to an e-mail recipient.
Old Annoyances
Other annoyances from Windows 2000 persist as well. The ability to specify faxing options on a per message basis for a fax message sent from Outlook using the Tools | Microsoft Fax Attributes menu is still missing when Word is the editor, ironic since Word is Outlook’s default mail editor in Outlook 2002. And the old Microsoft Fax Wizard still appears whenever you try to fax from an Office application using the Send To | Fax recipient command. If you use this option, you’ll get to send two faxes: the first will contain your default cover page plus the cover page the Microsoft Fax Wizard creates. The second will again contain your default cover page and the document you intended to fax in the first place. You should use theSend To | Mail recipient option instead to send through Outlook or print to the Fax Printer to send via the Send Fax Wizard. Remember that the wizard is now particularly useful since you have full access to your Outlook Address Book instead of the WAB.
More Information
- Windows XP-Based Fax Service Not Transferring Faxes to Outlook — The "resolution" in this article says that if you want to see WinXP faxes in your Inbox, you need to create a message, insert the fax as a file, and send the message to yourself. It would be easier just to drag the file into the Inbox?
- Fax4Outlook — improves integration between Outlook/Office and the fax service in Windows 2000/XP

